Welcome to day 2 of the Valentine’s Day Showcase!
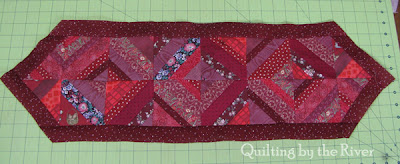
 Today Connie, from Quilting by the River, has an amazing tutorial for a Valentine’s Day table runner – change the fabrics and this will work for any time of year! Before the tutorial, let’s get to know Connie a little:
1. What got you hooked on your craft of choice? When I was about 16 I had a girlfriend whose mother was always cutting small squares of fabric and making quilts. Every time I went over there I was fascinated by what she was doing and I soon started cutting up scraps and making 9 patch blocks. My first quilt was hand tied with a blanket inside and flannel on the back. Over the years I have switched to painting, digital scrap-booking, counted cross-stitch but I always come back to quilting!
2. What lights your crafting fire (ie. what keeps you crafting, why do you do it?)? I love working with fabrics and the challenge of putting the right colors and prints together to make something special. Quilting the piece can also give it an entirely different look. I also love looking and adding to my beautiful stash!
3. What is your favorite Valentine’s themed junk food? My favorite Valentines’ treat is Hershey Kisses, they melt in your mouth!
And now – Connie – Take it Away
___________________________________________________________________________
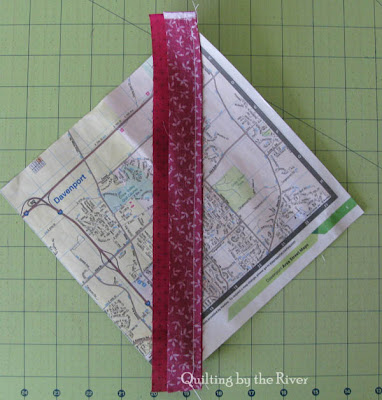
Start in the middle and put one strip right side up with another right side down on top of it and stitch. I have a couple used needles that I save for using on paper; use a small stitch so it will be easy to tear off the paper when you are done.
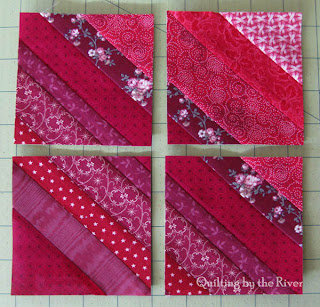
- Make 4 – 8 inch blocks
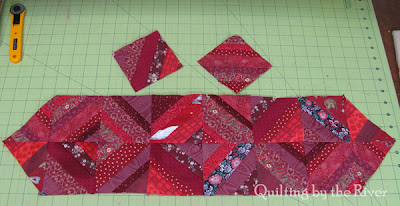
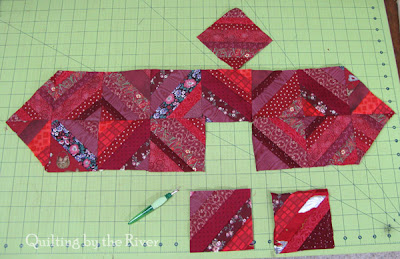
- Cut into 16 – 4 inch blocks (you will have 2 blocks left over)
- Take 2 of the blocks and cut them diagonally for your ends
___________________________________________________________________________
Thanks so much Connie for this wonderful tutorial! I love how versatile it is – change the fabrics and it can work for virtually any time of year! Tomorrow we will have Vicki from Sassy Blog – make sure you stop by to see her creation.
![]() NOTE: Don’t forget, I am one of the bloggers who is going to lose Google Friend Connect in March 2012, please take a moment and follow me via Bloglovin’, Facebook, RSS or networked blogs. You are important to me and I want to be able to stay in contact with you! Check my side bar for all the best ways to stay in touch after GFC goes bye bye!
NOTE: Don’t forget, I am one of the bloggers who is going to lose Google Friend Connect in March 2012, please take a moment and follow me via Bloglovin’, Facebook, RSS or networked blogs. You are important to me and I want to be able to stay in contact with you! Check my side bar for all the best ways to stay in touch after GFC goes bye bye!








What a great table runner! Thanks for the tute 🙂
Thanks ! It is great . This is perfect for me to try string blocks ; ;AND it’s pretty !!!!
I’m going to have many Valentine table runners after these two weeks, if you continue to post beautiful tutorials like this:-) Funny to see that Connie also have the experience that you see better on a photo than directly. I always use photoes to study the result before joining together the pieces.
Love your table runner Connie! I am going to try this technique for sure. My favorite is the heart(leaf) quilting on the border. 🙂
What a great table runner, Connie. I love how you made the larger block and then cut it into 4 smaller blocks – how efficient! I’ll be using that great idea in the future. 🙂
Love this Connie…I need to make a table runner for my daughter and this will work perfectly. Blessings, Marlene
Great runner and tutorial Connie…love the runner and your helper, Simon, always does a great job!! ~Terry~
Great job Connie!!
Wonderful runner, and such a good tutorial! I love making string blocks…this is such a cute way to use them. Thanks for sharing!
Thank you Connie for the great tutorial as always.
I really like the table runner. Thanks for the great tutorial.
Wonderful tute, Connie. String piecing is so much fun — I just love the ordered chaos it produces. What a grand idea you have: make a larger block and then sub-cut into 4 pieces! Wowzer… which i had known of this when i was making a bazillion little blocks for OB! lol. Thank you again. Your tute is very clear and your pictures are great!
Cool Table Runner! I love it! Thanks for sharing!
Thanks for the tutorial. Love the colors.
What a great looking tablerunner. I’ve never made this pattern but it’s one I’ve wanted to try. Thanks for the great tutorial!
Great tutorial!! Love the project: such a pretty table runner!!