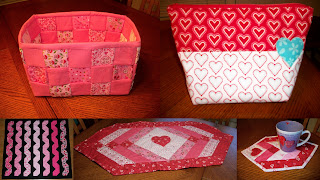
 Welcome to the Valentine’s Day Showcase! For the next 10 days (week days) I will be bringing you 10 fabulous tutorials from some very talented bloggers! Today I have Sharon from Craizee Corners kicking us off.
For fun I asked each of the bloggers 3 questions so you could get to know them a little bit better, here are Sharon’s answers:
1. What got you hooked on your craft of choice? Hmmm… This is a hard one. I saw a wall hanging that my sister did and that made me want to try quilting. I was at a point in my life that I was looking for a hobby so it all fit together. Like I was destined to be a quilter. I learned to sew with my Mom when I was younger, this just took it one step further. I want to be able to leave my family quilts to have as heirlooms for generations.
2. What lights your crafting fire (ie. what keeps you crafting, why do you do it?)? I would have to say that I need creativity in my life, it’s who I am. I am so happy when I can be creative. It’s that drive to show who I am thru what I make that keeps me going. Being able to take an idea and turn it into a quilt is very rewarding to me.
3. What is your favorite Valentine’s themed junk food? I’m not sure if this is junk food, but I love strawberries and champagne.
Now I’ll let Sharon take it away!
___________________________________________________________________________
Hi everyone! I’m so happy to be here at Sew BitterSweet Designs to kick off The Valentines Day Showcase! My name is Sharon and I blog over at Craizee Corners. As a matter of fact I just finished a Valentines themed week on my blog. If you missed any of the V-Week series here’s the projects and links:
Valentine Basket, Valentine Goody Bag, Snake Charmer Quilt, Love Braids Tablerunner and Love Braids Mug rug.
Today I am going to share with you the Love Braids table runner pattern.
The fabric I used is Always and Forever by Deb Strain. A jelly roll works great for this project.
You will need:
1 – 8.5″ square white print for the center block
8 – 2.5″ squares red print
4 – 8.5″ x 2.5″ strips of each of 4 different prints (light pink, dark pink, white and red)
2 – 2.5″ x 28″ strips red for the border
1 – 40″ x 20″ red for backing
1 – 40″ x 20″ piece of batting
3 – 2.25″ x WOF strips for binding
1 – heart applique
Steam-a-seam
1. Along the short side sew a red 2.5″ square to a dark pink 8.5″ x 2.5″ strip. repeat with another dark pink strip. Do the same with 2 of each of the other colors (light pink, white and red). Press the dark pink pieces towards the dark pink and the rest towards the 2.5″ red square.
Note – All seams are pressed away from the 8 1/2″ square from now on. I finger pressed everything until the end.
3. Sew a dark pink and red piece that you made in step 1 to an adjoining side of the square.
4. Sew the white 8.5″ x 2.5″ strip to the same side as the dark pink 8.5″ x 2.5″ strip, starting at the red square point.
5. Add the white and red strip to the dark pink and red piece starting at the top point of the white strip you just added.
6. Repeat for the other 2 colors.
7. Repeat on the other side.
8. Press the entire table runner top now.
9. Now its time to trim the table runner. Line up the ruler 1/4″ away from where the 2 pieces meet, which should be where the inside point is (where the seam ripper is pointing. cut along that line. Do this on both sides.
10. Sew on the 2.5″ x 28″ red strips to the long side of the table runner. star sewing with the strip at least 1″ away from the edge. do this on both sides.
11. Trim the borders even with the diagonal red strips.
12. Make a quilt sandwich and baste using your preferred method.
13. Following the directions affix the steam-a-seam (or other interfacing) to a 6″ square of red. Cut out a heart shape from the red fabric with interfacing. I used my Accuquilt die, but a hand drawn heart is good too.
14. Affix the heart to the center of the table runner, following the directions.
15. This can be machine or hand appliqued. I machine appliqued it using a blanket stitch.
16. With a blue fabric pen (disappearing ink) draw the arrow parts. I used a triple running stitch on my machine for the arrow.
17. Quilt the rest of the table runner as you would like.
18. Bind and enjoy!
I hope you enjoyed this tutorial. If you like this tutorial why not hop on over to Craizee Corners and let me know you saw me here?
Also if you would like a heart cutout with my accuquilt die, just let me know and I will send you one out.
Thanks Melissa for inviting me to be part of your Valentines Showcase! I can’t wait to see the rest of the Showcase projects!
________________________________________________________________________
Wow Sharon – what a gorgeous table runner and I love the technique you used! Thank you so much for sharing. Tomorrow we will have Connie from Quilting by the River
Have you started working your on Valentine’s Projects? Make sure you grab a button from my sidebar and get creating so you can enter to win some fabulous prizes on the 15th!
![]() NOTE: Don’t forget, I am one of the bloggers who is going to lose Google Friend Connect in March 2012, please take a moment and follow me via Bloglovin’, Facebook, RSS or networked blogs. You are important to me and I want to be able to stay in contact with you! Check my side bar for all the best ways to stay in touch after GFC goes bye bye!
NOTE: Don’t forget, I am one of the bloggers who is going to lose Google Friend Connect in March 2012, please take a moment and follow me via Bloglovin’, Facebook, RSS or networked blogs. You are important to me and I want to be able to stay in contact with you! Check my side bar for all the best ways to stay in touch after GFC goes bye bye!


What a great table runner! Sharon always has such neat projects, thanks Melissa for the Valentine’s Day Showcase!
Thanks! This project was a lot of fun!
Love the Table Runner Sharon, and all of your other projects. Great job!
Thanks, I loved using all these happy fabrics 🙂
Very cute! I love the fabrics used too.
Cute project. Thanks for sharing.
What a cute table runner!! I wish I had time to make one for this Valentine’s Day. Maybe next year! 🙂
Adorable Sharon! And that little heart in the center just adds so much personality to the runner. Love it! 🙂
what a lovely table runner! I just may have to give this a try!!
Sharon, this is a cute runner — I love my Accuquilt hearts die, too! LOL I just finished two projects for a hop in two weeks! Yippee! Thanks for sharing all of your creative ideas on your collage…they all are lovely. 🙂
So sweet! Although Valentine’s day isn’t that “big” in Norway, I’d like to make a tablerunner like this. Thank you!
Adorable table runner…may have to give this a try! Thanks for the tutorial!
I love this ! it’s so cute ; and you make it look easy ; thanks !
What a great way to begin the Valentine season!! It is a season now. I know this b/c the stores put out the Valentine stuff way too early, just like all the other seasons!!
Nice table runner!
Love the table runner. Wonderful fabric!
I enjoyed reading about Sharon’s project and learned of your showcase from her blog. Now I’m off to catchup on your other showcase posts.
Thanks everyone!
Great tutorial and runner Sharon! Love it!